Previous Topic: Opening an Order
The following sections outline the basic function perform within the Order Entry screen.
Speed buttons allow you to quickly access frequently used commands.These buttons are located just below the Selection window. You will notice that the speed buttons will disappear from the Selection window )The Speed buttons will move down the Selection Window depending on the amount of menu item, modifiers or commands listed. You can navigate to these buttons by flicking your finger/stylus in an upward motion on the screen.
Pnd- Tags the text in the Entered Characters (Abbr) area as “pending” and transfers it to the order. You must assign the pending text to a menu item/modifier before the table can be released or sent to the preparation areas.
Prev/Next: Use them to navigate/skip forced modifiers.
Find- Use this button to search for the text entered in the entered characters area. Upon pressing this button all the items containing the search string will appear in the selection window. This is especially useful for those rarely ordered items for which the abbreviations are not obvious.
SP-(Special instructions) Allows tagging items with ad-hoc written information.
You may notice that speed buttons will disappear from the screen .The Speed Buttons (Prev, Next, Pnd, etc) will move down the Selection Window depending on the amount of menu items, modifiers, and command displayed. You can navigate to these buttons by flicking your finger/stylus in an upward motion on the screen.
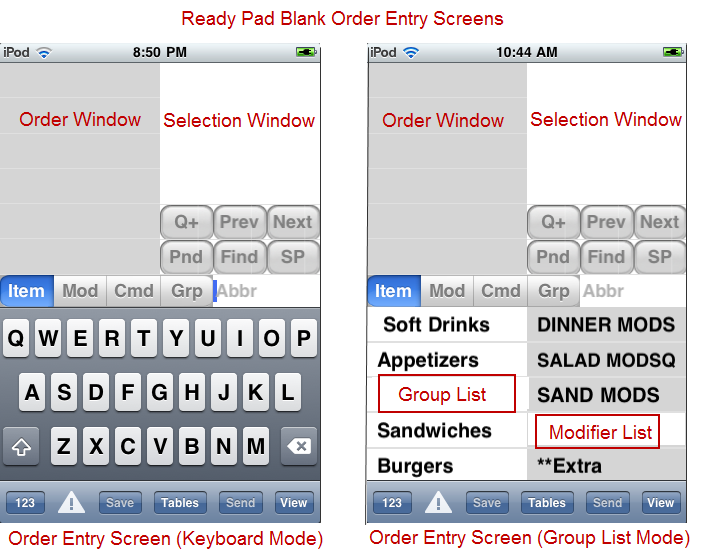
Function buttons control the input method of the Write-on and determines the data displayed on the Selection window. After selection, each function button will turn a different color indicating which mode your are in.
Items- Puts the Command/Modifier input area (abbr field) into item mode. The program will attempt to match entered abbreviations with menu items.
Mod - Puts the Command/Modifier input area(abbr field) into modifier mode. The program will attempt to match entered abbreviations with modifiers.
Cmd - Puts the Command/Modifier input area (abbr field) into command mode. The program will attempt to match entered abbreviations with commands.
Grp- Puts the program in Group input mode so you can select a menu group to view. To narrow down to a desired group, start writing the name of the group.
Note: both [Item] and [Mod] buttons are disabled in Group List Mode.
At the bottom of the screen lies the tool bar, which also includes a number of speed buttons used to process an order
123/ABC- Toggles the keyboard between letter and number modes.
Alert Icon- Tap view Alert screen. Button when blink when alert is waiting to be viewed.
Save- : Saves ordered items without sending. Icon becomes active when items are ordered or a table/tab number has been assigned.
Table- Releases table without items ordered, returns user to Table Selection screen.
Send - Sends the order to the preparation areas.
View- Displays the order using the whole screen.
There are many functions needed to process orders. The nature of the hospitality business demands this. The most frequently used commands are found on the Speed buttons or Toolbar. The Write-On for iPod touch offers two additional command methods: Item and General commands.
Item Commands- Item commands tend to affect single menu items. Item commands are access by selecting a menu item, pausing, and then tapping a menu item again. This process will display a list of item commands on the Selection screen. Use the [Cancel] option on the list to leave the Item Command menu if making no changes to an item.
General Commands- General Commands tend to affect an entire order or the behavior of the Write-On iPod unit. General commands are access by tapping the Command button and then selecting a command on the selection screen.
The following is a list of both item and general commands:
Item Commands General Commands Delete Alerts (AL) Quantity Customer Count (CC) Adjective Find Item (F) Cancel Logout (L) Course Open Order (O) Discount Item Options (OP) Hold Printer Select (P) Price Adjust Recover Order (RO) Seat Modify Reference Assign (RA) Special Instr Release Table (RT) Timed Send Seat (S) Settle Check (SC) Send & Stay (SS) Table Assign (T) Unlock Table (UT) View Check V)
There are two methods to add items to an existing order. You can record the new items on the blank order entry(Ready Pad) screen and then append them to the existing order, or you can first retrieve the order and then add the items. The former method is quicker; however you must be careful to assign the new items to the correct table. If you wish to retrieve the order before adding the items, exit the blank order using the [Tables] button and bring up the Table Selection screen.
To order an item, simply enter its abbreviation. The abbreviation is typically the first few letters in each word (bottle bud =BB). Select the desired menu item in the Selection Window either using your finger or a stylus to move the item over to the Order Window. If the menu item has forced modifiers attached, you will automatically be prompted for those in the Selection Window.
In Group Mode, you must first select the menu group containing the desired menu item on the Menu Group Window. Once the correct menu group is selected, you may tap the menu item located in the Selection Window.
Forced modifiers (pop ups with a “minimum” setting greater than zero) will immediately appear in the Selection Window after a menu item has been selected. After modifiers are selected, they will appear indented directly below the menu item on the Order Window. The user must make a choice at some point before sending the order. The order entry user interface will prompt in the usual order, but also allow the user to skip forced modifier pop ups. If skipped, the user must return to make a selection later.
(Also See: Adding Free Modifiers)
Use the Next button under the Selection Window to skip to the next different modifier window option. Use the Cancel option at the end of the modifier list to terminate forced modifiers altogether.
Simply highlight the modifier you wish to change in the Order Window, and then choose the desired replacement from the Selection Window. Forced modifier placeholders can later be replaced with a selection in the same way, by tapping the line in the Order Window, which will cause the options for choosing to appear in the right Selection Window.
Use the [SP] speed button or command to enter an ad-hoc instruction, modifier, or any other text associated with the selected ordered item that you wish to send to the preparation areas. The special instruction will appear as modifier to the base item. Only one special instruction per item is allowed.
Alternatively, use the Special Instr item command by selecting the menu item on the Order Window, pause, and tap again. Select the Special Instr command in the Selection Window to the right.
Select the item you wish to delete on the Order Window and flick your finger/stylus to the right. A small red delete button will appear (pictured below). At this point touch the “delete’ button to remove the item. Alternatively, use the Delete item command by selecting the menu item on the Order Window, pause, and tap again. Select the Delete command in the Selection Window to the right. Regardless of the method used and depending how your system is configured, you may be prompted to enter a reason from a predetermined list when deleting items already sent.
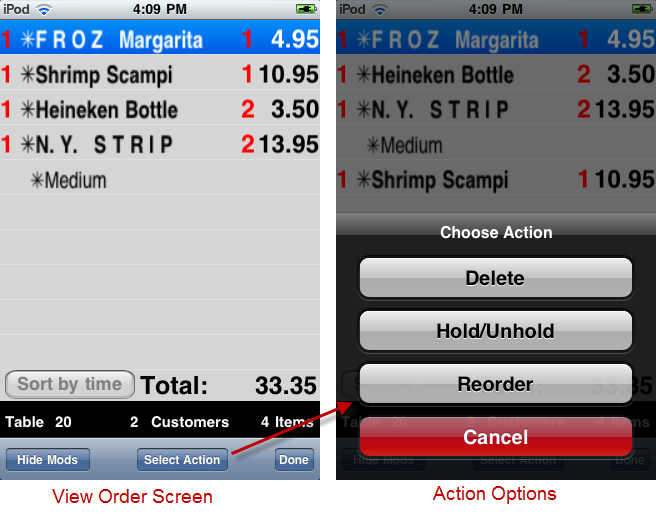
If you have multiple deletions to perform, you will want the Delete command found under the Selection Action list in the View Order screen. Press the [View] button to enter the View Order screen. Tap all the items on the item list, press the [Select Action] button, and select the Delete option.
If the “Ask For Seat Number” option is enabled, the ASI Write-On displays the possible seat numbers in the Selection Window after the item and associated modifiers have been selected. You then can either select a new seat number for the just selected item, or continue entering new items. If a new seat number is selected it becomes the currently active seat number and subsequently entered items are assigned this number by default. When enabled, seat numbers will appear to the right of the menu item on the Order Window.
Use the [Send] button on the toolbar located at the bottom of the Order Entry screen to send menu items to their designated prep printers. Sent items are marked with an asterisk (*) to the left of the item on the Order Window.
Use the [View] button on the toolbar to get a full screen view of the order. If the full order does not fit the screen, flick your finger up or down on the screen to move around the order. In addition, you can use the [Hide Mods] button to have the screen display only main menu items. From this screen you can also delete, hold/unhold, and reorder items by pressing the [Select Action] button at the bottom of the screen. If needed you can sort items listed in the View Order screen using the [Sort by Time] or [Sort by Seat] toggle buttons.
There may be a need to add a modifier to a menu item and the needed modifier has not been assigned to the menu item (forced). In Restaurant Manager terminology we call these "Free Modifiers". Free Modifiers are any programmed modifiers that exist is the system.Unlike the name suggests, free modifiers may have an associated price. You may add a free modifier to a menu item by selecting the [Mod] command button and then type the abbreviation of the modifier using the keyboard.
Adding a free modifier to a menu item in Group Mode is similar to adding a menu item. However, rather then selecting the Menu group, you will have to select the modifier group on the Modifier Group Selection Window containing the desired modifier. You can then select the modifier in the Selection window.
Simple adjectives will appear along with the free modifier choices, and will apply to the item or modifier that is currently selected in the Order Window. Simple adjectives can also be chosen through use of the Adjective item command or the Adjective [Grp]. Adjectives can be changed and deleted in the same way as a free modifier. The same user interface rules that apply to free modifiers and modifier popup's also apply to simple adjectives.
If you do not know the abbreviation of an item, or if the “intuitive” abbreviation you entered does not bring up the desired item, use the [Find] button to search the whole menu for the item you are looking for. The [Find] button will use the text in the Abbr area to perform the search and will display all items containing the text in the selection window. For example if you searched for “chic” you would see both “chicken nuggets” and “fried chicken wings” (assuming they are both in the menu!)
Use the [Pnd] (pending) button if you are at the table taking the order and the abbreviation you enter doesn’t bring up the desired item, or you cannot isolate it by use of the Find button. Simply enter an abbreviated description of the item you cannot find (enough letters to remind you later of what was ordered), and then touch the “Pending” (Pnd) button. Your abbreviated description will be added to the order, allowing you to move on to the next item. For example, the customer wants a Beefeaters on the rocks and you enter “be” which brings up “Beans” instead of the drink you are looking for. Then you enter “gin” (hoping to find the Gins) and hit the Find button and still no Beefeaters. This is the point at which you should worry! Instead, add “beef” to the already entered text so it reads “ginbeef” and touch the “Pnd” button. Then, once you’ve taken the rest of the order and have left the table, you can take your time to search for the gin to replace the “pending” entry you made.
To easily identify pending items, they are enclosed in square brackets. Note that before you can send the order, you must replace the pending item with a valid item.
You can replace a pending item with a menu item by first selecting the pending item to put the order entry screen in replace mode. Next, enter the abbreviation or use the find button to find item you wish to replace the pending item with. Once the pending item is replaced, the program automatically returns to item entry mode.
Go to the Order View screen by touching the [View] button on the lower toolbar and touch the items you wish to reorder. Press the Select action button at the bottom of the screen and select the Reorder button on the Select action list.
To adjust the seat number assigned to an item, simply select it and touch the desired seat number in the Selection Window. An alternative method is to use the Seat Modify item command by selecting the menu item on the Order Window. pause, and tap again. Select the Seat Modify command in the Selection Window to the right. Enter the new seat number in the prompt using the keyboard or use the [Plus] / [ Minus] buttons for incremental changes.
Taking order starting at seat number one is not always feasible. The person at seat 10 on a table of twenty customers may volunteer to be the first person to order while everyone else hee and haa's. In this scenario, you can use the Seat general command to jump the default seat number. Press the [Cmd] function button and select the Seat command on the list in the Selection Window. Enter the seat number you wish to start with when prompted and press the [Done] button when finished. You will be redirected to the Order Entry screen where you proceed to add items.
Default table seat minimums are setup in the Table Layout form in the Restaurant Manager BackOffice Module. Default seat numbers for a table are overwritten when entering customers counts (after sending order) . However, there are occasions when you must increase the customer count to associated items with seat numbers: especially in establishments where the Write-On is being used in a team service environment (i.e. food runners). Use the Customer Count general command to increase seat numbers. Pressing the [Cmd] button and selecting the Customer Count option. Use the keyboard to enter a specific total number of customers or use the [Plus] /[Minus] buttons to increase or decrease the customer counts in increment of one. Use the [Done] button to return to the Order Entry screen.
The Timed Send feature allows you to set the number of minutes that Restaurant Manager will wait before an item is sent to its corresponding preparation area. For example, if a party of two is on a date and order several courses with instructions not to be rushed. The server will need an ordering mechanism to carefully time each course. To set the delay time for multiple menu items use the [Timed Send] item command. However, this method can only be used for one item at a time. To access the Time Send command:
You will need to repeat this process for each course.
IMPORTANT: We strongly recommend you use the Timed Send feature instead of the Hold Item feature to delay sending items.
Use the Hold item command by selecting the menu item on the Order Window, pause, and tap again. Select the Hold command in the Selection Window to the right. You will have to perform this action repeatedly for every item you wish to hold.
Alternatively, you can use the Hold/Unhold option found under the Selection Action list in the View Order screen. Press the [View] button on the toolbar. Tag all the items on the item list in the View Order Screen that you wish to hold, tap the [Select Action] button at the bottom of the screen, and the select the Hold/Unhold option. This method is ideal for performing the Hold function on multiple items at the same time.
Either method may be employed to Unhold items.
Use this feature to prevent items from being sent to the designated prep printers. To send the items at a later time, you must first retrieve the order and “un-hold” the held items. Held items are tagged with a “greater than” symbol (>).
Tap the [Q+] button to increment the quantity of the selected item. Or, to change to quantities in greater increments of one, use the Quantity item command by selecting the menu item on the Order Window. pause and tap again. Select the Quantity command in the Selection Window to the right. Enter the quantity when prompted. This method can also be used to decrease quantities. Items Quantities will appear to the left of the menu item on the Order Window.
To access the Change Course command, use the Course item command by selecting the menu item on the Order Window, pause, and tap again. Select the Course command in the Selection Window to the right. Select the new course in the Selection Window. The selected course will be added to the modifier list for the item. Note that to avoid clutter, only non-default coursing information is shown. You can also delete a course by touching the course on the Order Window and flick your finger/stylus to the right. A small red delete button will appear. At this point touch the [Delete] button to remove the course.
Use the Discount Item item command by selecting the menu item on the Order Window, pause, and tap again. Select the Discount Item command in the Selection Window to the right. You be presented with a list of discounts to apply in the Selection Window. Select the discounted needed. The selection may be followed by a discount percentage if applicable. For discounted items, a line entry will appear in the order entry box showing the discount applied. You can tap this line to modify the discount, or with the discount selected left to right flick to delete it.
There may be an occasion where you will need to adjust a price for a menu item. Use the item command Price Adjust by selecting the menu item on the Order Window, pause, and tapping again. Select the Price Adjust option on the Selection Window. Use the keyboard to enter a new price. The plus and minus buttons will round up or down the amount displayed in dollar increments. Use the [Done] button to return to the Order Entry screen.
Currently not supported on Write-On for iPod
Use the [Printer Select]general command to redirect the printing of a guest check to another printer other than the default guest check printer. Press the “Cmd” function button on the Order Entry screen and select the [Printer Select] option on the command option list on the Selection Window.
From the Printer Selection screen you can choose:
Use the RT (Release Table) command to release the active order WITHOUT sending the items to the prep areas. Press the [Cmd] button and select the Release table command.
An alternative method to leave an active order without sending items is the [Save] function button. Simply press the [Save] function button located at the bottom of the Order window. You will be redirected to the Table Selection screen where you can either save the order to an existing or new table.
Use this function if for some reason the device leaves the Write-On application with menu items unsent. This may happen if you accidentally hit the iPod Menu button or the iPod device can't find the network. Upon re-entering the Write-On application you be prompted to recover any lost orders.
At this point you may re-enter the table, press the [Cmd] button, and select the Recover Order command (RO). At this point, you will be prompted recover the "previous" or "most recent" order. below each option you will find a list of menu items associated with the order. Use this list to select which version of the order you wish to recover.
Press the [Open] button after making your selection and then confirm your selection.
You have two methods to use if you are in the Order screen and wish to exit to open a different existing table:
Both operations will redirect you to the Table Selection screen where you may choose the desired table or tab to open
Note: you will be prompted to save or send if there are any menu items on the Order Window that have not been sent.
This function can only be perform in Ready Pad Mode (Blank Order). On occasion it may be advantageous to enter select menu items, send them right away, and continue with the order. Example: you may choose to take a round of drink orders, send them to the bar, and continue taking the food order. The advantage to this methodology is that the drinks will be prepared and ready while taking a food order. This not only speeds up service but can also increase check averages.
Use the Send and Stay general command when implementing this service method. After ordering menu items, press the [Cmd] function button on the Order Entry screen and select the Send & Stay option in the Selection Window. On tables previously assigned, items will be sent and you will remain in the order entry screen. On order with no table assignment, you will be directed to the table Selection screen where you will need to enter a table number before you can return to the Order Entry screen.
Use the general command Reference Assign to open a new tab or change the reference of an existing tab from the Order Entry screen. You can assign an reference to an order at any point prior to saving or sending a new order. Press the [Cmd] function button and select the Reference Assign option on the Selection Window. You will be prompted to enter a reference. Press the [Done] button when finished to return to the Order Entry screen. When ready, use the [Save] or [Send] button to exit the order. At this point, if having created a new tab, you will be prompted to enter seat numbers.
Use the general command Table Assign to open a new table from the Order Entry screen. Press the [Cmd] function button and select the Table Assign option on the Selection Window. At this point you will be directed to the Table Selection screen. Enter the table number you wish to use. Press the [Done] button when finished to return to the Order Entry screen. When ready, use the [Save] or [Send] button to exit the order. this process can be used for opening new orders or accessing an existing order.
Note: This function requires the Require Table Clear option to be enabled in the RM BackOffice Station Setup Form. From the Table Selection screen, select the table you wish to clear, tap [ Actions], and touch the [Clear] button
Managers can change the behavior and display characteristics of the Order Entry screen using one or more of the settings under the Options general command. This topic is covered in greater detail in the document. Write-On for iPod Touch Managers Guide.
By default the alerts are “passive”, and are only displayed on the Write On device. Text alerts are sent to the Write On device automatically. Alerts may be viewed at the time they are sent or may be reviewed at a later time.
After being sent, the Alert icon on the bottom toolbar will flash. You can view the alert by pressing the flashing icon
Once in the Alert window, select the message or alert from the list to read. Note that Alerts will be sorted in the order they were received newest alert to last. The time the alerts is sent is found the right of the alert. Alerts with blue dots to the left of the folder indicate the alert has not been read. The different kind of alerts are defined on the alert row in bold text (i.e. message form station and text alerts). Use the [Done] button to exit the Alert screen.
Messages will be saved until they are manually deleted. Alerts are deleted by swiping your finger left to right across the alert and the pressing the delete button.